Thursday, July 23, 2009

Barefoot Blogger's Peach Blueberry Crumble


This was the second Barefoot Blogger pick for July. I actually made this to take to a 4th of July cookout. It was a huge hit. I'm a big fan of Ina's recipe for Apple Pear Crisp. Somehow with as many times as I have flipped through my Ina cookbook's I never really noticed this Peach Blueberry Crumble. I'm so glad I was forced to notice this one. It was just as delicious as the apple pear version. I now have two perfect seasonal fruit dessert recipes. This is the perfect accompaniment to a barbecue dinner or a casual dinner party. If you bring this one to someones house they will thank you! The only change I recommend is if you don't do individual servings, double the crumble topping. It looked like I had enough topping when I put it on but after baking it was very sparse. The crumble is really yummy so you want to have lots of it on there! I used in season Texas peaches for my crumble. I know my husband will be requesting this one again! I'm also looking forward to serving this in individual servings as Ina suggested and pairing with a homemade ice cream. Thanks to Aggie of Aggie's Kitchen for picking this one. My picture of this recipe does not do it justice!

Peach Blueberry Crumble

For the fruit

  • 2 lbs firm, ripe peaches (6-8 peaches)
  • 2 tsp grated lemon zest
  • 2 tbsp freshly squeezed lemon juice
  • 1/2 cup granulated sugar
  • 1/4 cup all-purpose flour
  • 1 cup fresh blueberries (1/2 pint)

For the Crumble

  • 1 cup all-purpose flour
  • 1/2 cup granulated sugar
  • 1/4 cup light brown sugar, lightly packed
  • 1/2 tsp kosher salt
  • 1/4 tsp ground cinnamon
  • 1/4 lb (1 stick) cold unsalted butter, diced
Preheat the oven to 350 degrees.

Immerse the peaches in boiling water for 30 seconds to 1 minute, until their skins peel off easily. Place them immediately in cold water. Peel the peaches, slice them into thick wedges, and place them in a large bowl. Add the lemon zest, lemon juice, granulated sugar, and flour. Toss well. Gently mix in the blueberries. Allow the mixture to sit for 5 minutes. Spoon the mixture into ramekins or custard cups.

For the topping, combine the flour, granulated sugar, brown sugar, salt, cinnamon, and the butter in the bowl of an electric mixer fitted with a paddle attachment. Mix on low speed until the butter is the size of peas. Rub the mixture with your fingertips until it’s in big crumbles, then sprinkle evenly over the fruit. Place the ramekins on a sheet pan lined with parchment paper and back for 40 to 45 minutes, until the tops are browned and crisp and the juices are bubbly. Serve warm or at room temperature. If you want to make these early, store the unbaked crumbles int he refrigerator and bake before dinner. Serves 5 to 6.

Source: Ina Garten, Barefoot Contessa At Home, Clarkson Potter, 2006.

Wednesday, July 22, 2009

Zucchini Bread


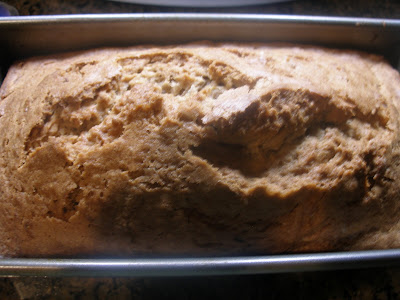
Just when I had some leftover zucchini I needed to use up, this recipe for zucchini bread appeared on Cooking This and That. I knew this recipe would be great since Colleen and I seem to like the same recipes. Several times we have made or commented about liking the same recipe. It was a random but funny coincidence. This recipe lived up to my expectations. I made one large loaf instead of the two, cooking mine about fifteen minutes longer. This bread was moist, had just the right amount of sweetness and I like to think was healthy because of the zucchini! My husband commented that he couldn't stop eating it.! Definitely a keeper recipe at our house. Also, as recommended by Colleen, you must serve this warm with cream cheese!

Zucchini Bread
from Jo's Kitchen
Makes 2 loaves


3 eggs
1 cup oil (vegetable or canola)
2 cups sugar
1 teaspoon vanilla
2 cups raw, peeled, grated zucchini (2 small zucchini)
3 cups flour
1 teaspoon salt
3 teaspoons cinnamon
1/4 teaspoon baking powder
1 teaspoon baking soda


Preheat oven to 350 degrees F. Grease and flour two 8 x 4 loaf pans. (9 x 5 pans are fine too, your loaves will just be a little shorter.)


Beat eggs in a large bowl with electric mixer until foamy. Add oil, sugar, and vanilla. Beat in zucchini.


Whisk together flour, salt, baking soda, baking powder, and cinnamon. Add into zucchini mixture and beat on low until combined.


Divide batter evenly between prepared pans. Bake for one hour or until toothpick inserted in center of loaf comes out clean. Run a butter knife around the edge of the loaves, cool for 15 minutes. Turn out onto a wire rack to cool completely.

Source: Cooking This and That.

Monday, July 20, 2009

Barefoot Blogger's Pasta with Sun Dried Tomatoes


I was really excited about this months Barefoot Blogger's picks. They were absolutely perfect for summer and both took advantage of in season produce. The first recipe was Ina's Pasta with Sun Dried Tomatoes. This dish took about 15 minutes total to prepare and could be served warm or cold. I chose to serve it cold. This dish has great Mediterranean flavors. The saltiness of the olives and capers balanced quite nicely with the flavors of the fresh ripe tomatoes. The mozzarella was basically a blank canvas to soak up all these wonderful flavors. I would recommend making this dish a day ahead to really allow the flavors to meld. I'm not a huge fan of most pasta salads found at pot lucks. They are often bland and slathered in salad dressing. Not an inviting dish to me. This pasta salad though had lots of flavor from the homemade sun dried tomato dressing. This dressing wasn't over powering but enhanced the dish. The dressing would be great for salad also. Thanks to Cat of Delta Whiskey for this great pick. I now have two go to recipes for pasta salad. My other favorite is this Pasta, Pesto and Peas recipe, also from Ina.
Pasta with Sun Dried Tomatoes
  • 1/2 pound fusilli (spirals) pasta
  • Kosher salt
  • Olive oil
  • 1 pound ripe tomatoes, medium-diced
  • 3/4 cup good black olives, such as kalamata, pitted and diced
  • 1 pound fresh mozzarella, medium-diced
  • 6 sun-dried tomatoes in oil, drained and chopped

For the dressing:

  • 5 sun-dried tomatoes in oil, drained
  • 2 tablespoons red wine vinegar
  • 6 tablespoons good olive oil
  • 1 garlic clove, diced
  • 1 teaspoon capers, drained
  • 2 teaspoons kosher salt
  • 3/4 teaspoon freshly ground black pepper
  • 1 cup freshly grated Parmesan
  • 1 cup packed basil leaves, julienned

Cook the pasta in a large pot of boiling salted water with a splash of oil to keep it from sticking together. Boil for 12 minutes, or according to the directions on the package. Drain well and allow to cool. Place the pasta in a bowl and add the tomatoes, olives, mozzarella, and chopped sun-dried tomatoes.

For the dressing, combine the sun-dried tomatoes, vinegar, olive oil, garlic, capers, salt, and pepper in a food processor until almost smooth.

Pour the dressing over the pasta, sprinkle with the Parmesan and basil, and toss well.

Source: Barefoot Contessa Family Style, Clarkson Potter 2002.

Here is a recent shot of my Aerogarden. I'm hoping next time I make this recipe to harvest my own basil. I can't believe how fast its growing!


Sunday, July 19, 2009

Yoplait Delights Product Review


I was offered the opportunity to review Yoplait's new line of yogurt, Yoplait Delights Parfaits. In full disclosure, in exchange for my participation in the review, we were given the HD Mino Flip video camera. We were asked to use the video camera in our review of the product. I think you will find my review of this product honest and truthful and of the quality you would expect from this blog. I would never accept review of a product if I was not allowed to be honest and truthful about it in my review.

In completion of our review, we sampled the chocolate raspberry and lemon torte varieties of this yogurt. Each package contains 4 4-0z cups. Each cup is 100 calories. The Yoplait Delights are made with lowfat yogurt, have 1% milkfat, vitamins A&D added, and contain live and active cultures.

If you have been a long time reader of this blog, you will probably notice the recipes featured in this blog strive to use only natural products and generally lean toward organic when possible. We do not buy products containing artificial flavors or sweeteners. In reviewing this yogurt, I was torn about how to do the review, since it contains artificial flavors and is artificially sweetened with sucrolose. Had I been aware of this prior to accepting this review, I would not have agreed to do the review due to my bias against these ingredients.

My husband sampled both flavors and said that he liked the yogurt and thought it was good for a snack. He did not find the sucralose to be as obvious as some other artificial sweeteners such as aspartame. I liked the creativity of the flavor combinations combined with the fact that it was a 100 calorie product. The lemon torte flavor has a beautiful layer of cream on top reminiscent of lemon meringue pie. The chocolate raspberry reminded me more of a pudding than yogurt. I however, was disappointed they could not find a way to create a product like this without the artificial flavors. I found both varieties of this yogurt to have an overly sweet aftertaste indicative of an artificially sweetened product but agree with my husband it did not have the same chemical after taste as those products sweetened with asparatame. Also, as I understand sucralose is the main ingredient in Splenda. I think if you are looking for a low calorie product and don't mind artificial sweeteners you will likely enjoy this product. I often buy one of my favorite organic yogurts which has chocolate on the bottom and I have to say this product just did not compare for me. I cannot personally recommend this product due to the addition of the artificial ingredients. I do, appreciate the opportunity to provide feedback on this product and hope to provide more reviews in the future.

I absolutely love the new HD video flip. Its so convenient to just toss in a purse or back pack. I'm excited that now I will always have a video camera handy to capture those treasured moments. The simplicity of use also cannot be beat. The instruction manual was one small sheet. Perfect for someone like me who would never read a long and complicated instruction manual. I apologize in advance for our bland video. This explains why my husband and I are not in advertising or other fields requiring entertainment production! Our best videos include our toddler but we were not comfortable putting that out on the web.


Saturday, July 18, 2009

Blueberry Sour Cream Ice Cream


I have an ice cream loving toddler in my house. I really think ice cream has become one of his daily food groups! So, what better idea on a hot summer day than for the toddler and I to make our own homemade ice cream. We were originally going to make a honey peach ice cream but some how I grabbed nectarines instead of peaches. So, onto plan B, this blueberry ice cream. This was simple to make as far as ice cream goes. No custard to cook. Although this is an ice cream recipe, the addition of the sour cream adds a tang that could allow this dish to pass for a frozen yogurt. My husband likened the flavors to a berries and cream. We are looking forward to more ice cream creations. This one will no doubt be gone before the weekend is over! Someone remind me though, why I made a toddler purple ice cream!!

Blueberry Sour Cream Ice Cream

1 cup blueberries - fresh or frozen (if frozen, thaw and drain)
1/3 cup sugar (or more to taste)
pinch of salt
grated zest and juice of 1/4 lemon (or lime as you prefer) or more juice to taste
3/4 cup heavy cream
3/4 cup sour cream

Put the blueberries, sugar, salt and lemon zest and juice into a medium nonreactive saucepan and cook over medium heat, stirring, until mixture boils and the berries pop and soften, about 3 minutes.

Turn the berries into a blender and whir until you have a fairly homogeneous puree, about one minute. (It will never be completely smooth, and that's just fine.) Add the heavy cream and sour cream and pulse just to blend. Taste and, if you'd like, add a squirt more lemon juice or a tiny bit more sugar.

Pour the custard into a bowl and refrigerate until it is chilled before churning it into ice cream.

Scrape the chilled custard into the bowl of an ice cream maker and churn according to the manufacturer's instructions. Pack the ice cream into a container and freeze for at least 2 hours, until it is firm enough to scoop.


Source: Baking From My Home to Yours, Dorie Greenspan.


Tuesday, July 14, 2009

Herbed Stuffed Chicken Breasts


I needed some quick dinner inspiration so I consulted my well worn copy of The Lady and Son's cookbook. This recipe sounded great and I only needed to purchase the feta to make it as I had everything else on hand. We really liked this recipe. This would be great entree for a casual dinner party. The dish is pretty simple to prepare and makes an elegant presentation, especially if you tie it with the leeks as suggested by Paula Deen. I skipped that step since it was just a week night dinner for us. I think next time I might subsitute chicken broth for the melted butter just to make it a bit healthier. I served this with a Near East rice pilaf mix and a strawberry spinach salad.

Herbed Stuffed Chicken Breasts

4 whole skinless boneless chicken breasts (approximately 5-7 oz each)
One 3-ounce package cream cheese, softened
3 oz feta cheese, crumbled
1/2 teaspoon dried sweet basil
1/2 teaspoon dried oregano
1/2 teaspoon House Seasoning
4 slices bacon
1 leek, optional
4 tablespoons (1/2 stick) butter, melted

Preheat oven to 275 degrees. Wash and pound each chicken breast flat. Lay chicken breast on cookie sheet and spread it with cream cheese, followed by 1/4 of the feta cheese. Mix together basil, oregano and House Seasoning and sprinkle with chicken. Roll up each breast and wrap with a slice of bacon. At this time, if desired, you can tie up each rolled chicken breast with the green top of the leek. Place chicken breasts in a casserole dish and pour melted butter all over. Cover casserole dish with foil and bake for 1 1/2 hours. Uncover dish and increase temperature to 350 degrees. Continue to bake, allowing the bacon to brown, for 15-20 minutes. Or you could place dish under broiler for a few minutes to brown. Serve over rice with pan juices poured on top.

Source: The Lady and Sons Savannah Country Cookbook, Random House, 1997.

Friday, July 10, 2009

Oven Roasted Ribs

This recipe was so fantastically easy and so delicious that I had to post it! I hated posting without a picture but these were gone in a flash before I even had a chance to get a picture. That is how good these are! If you decide to make these, be sure to plan ahead for at least a 4 hour marinade. I marinated mine overnight. These can be eaten as is or served with barbecue sauce. This recipe has tied for first place with our favorite Memphis style rib recipe. The cooking method for each is the same and both recipes yield a moist and tender rib. Both also use a dry rub, which in my opinion produces the tastiest ribs. The Memphis style ribs have a good savory flavor which is enhanced by the chili powder, paprika and oregano. In contrast, these ribs are also perfectly seasoned and have a slightly smokey garlicky taste to them. With either recipe I recommend using this barbecue sauce. There are worse things than having two killer rib recipes. The hardest part will be deciding which one to make next time! For a quick summer dinner, I served these with steamed corn on the cob and coleslaw.

The Lady's Oven Roasted Ribs

One 5-pound slab pork ribs
4 teaspoons liquid smoke
2 teaspoons House Seasoning (I mixed garlic powder, onion powder, and salt and pepper)
2 teaspoons seasoned salt

Wash ribs and drain. Rub each side with liquid smoke, garlic powder, salt, pepper, and seasoned salt. Refrigerate fro 4-24 hours. Preheat oven to 325 degrees. Roast uncovered for 1 1/2 hours.

Source: The Lady and Sons Savannah Country Cookbook, Random House, 1997.

Tuesday, July 7, 2009

Tomato Pie


Each week I look forward to the Wednesday edition of our local newspaper which contains the food section. Although increasingly smaller than in years past, the food section usually has an interesting article or two and I have found some great recipes over the years. A few weeks ago they ran an article on summer tomatoes and I found this recipe for tomato pie. I have never made nor had tomato pie but it sounded like a perfect way to use up those beautifully ripe and fragrant in season tomatoes. I have since learned tomato pie is a genuinely southern staple. This recipe is so easy to make and a winner for both my husband and myself. I know I've found a good one when it is requested that I add it to our rotation! The best way I can think to describe this is--BLT in a pie shell! This recipe is great for a weeknight dinner or a casual lunch or brunch.

Tomato Pie

1 unbaked (9-inch) pie crust (I used a Wholly Wholesome organic pie shell)


1 (6-ounce) package loose-leaf baby spinach (I used organic mixed greens)


6 ripe Jacksonville or other local tomatoes, sliced horizontally


1 large sweet onion, chopped


12 strips bacon, cooked and crumbled (I used a nitrate, preservative free bacon)


½ cup mayonnaise


2 cups shredded mozzarella (I used a mix of 4 cheeses with cheddar and Monterrey jack)

Preheat oven to 350 F. Bake the crust for 10 to 12 minutes. Remove crust and increase oven to 400 F.

In the partially baked crust, layer 1/2 of the spinach, 1/2 of the tomatoes, 1/2 of the onions and 1/2 of the crumbled bacon. Repeat with a second layer.

In a small bowl, thoroughly blend mayonnaise and mozzarella. Spread on top of the pie. Bake 45 minutes. Let rest for 10 minutes before serving.

Makes 6 servings.

Source: Dallas Morning News, June 30, 2009.